How to Use Your Alarm System
Keypad Usage & System Information
Redwood Security wants to ensure that all customers can use their systems with ease. If you have had any work done involving your home's phone lines since your alarm was installed, please call (415) 388-5355 to check that your system is successfully sending signals to our central monitoring station, thank you.
|
Testing your System:
It is very important for every RSS customer to test their system to ensure it is sending signals and working properly.
|
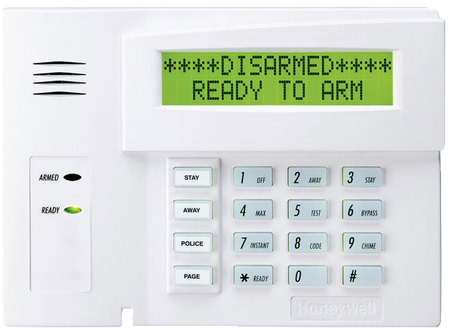
Quick Reference Keypad Operating Guide
Arm and disarm your security system by entering your 4-digit Master Security Code then a function. If a perimeter device or zone is tripped while armed, an alarm response will be triggered. When you leave or return through a predetermined Entry/Exit door, the system has a programmed delay period (usually between 30-45 seconds) that allows you to disarm your system before it dispatches an alarm signal.
If your alarm system is tripped, enter your Security Code + 1 (OFF), which will silence the siren, then enter your Security Code + 1 (OFF) once again to reset your alarm system. Call Redwood Security if you would like to change your Master Code, or have had recent phone line work done.
OFF | Disarm System: Turns off the system when activated, silences alarms, and clears alarm tripped states.
- Security Code + 1 (OFF)
- Security Code + 2 (AWAY)
- Security Code + 3 (STAY)
- Security Code + 6 (BYPASS) + Zone Number (01, 02, etc.)
- Security Code + 4 (MAX)
- Security Code + 7 (INSTANT)
- Security Code + 5 (TEST)
- To Add: Security Code + 8 (CODE) + User Number (starting with 03, then 04, etc.) + Temp. 4-digit code
- To Delete: Security Code + 8 (CODE) + User Number (03, 04, etc.) + # (Pound key) + 0
- Security Code + 9 (CHIME)
- * + # (Star key + Pound key)
- * (Star key)
- Existing Security Code + 8 + 02 + new 4-digit Code (x2)
Portable Panic Button Battery Replacement:
If you haven’t replaced the battery in your portable panic button(s) within recent memory, it is time to replace and test your panic button. First, you will need one battery per panic button. Locate your portable panic button(s) and with your account number in hand (from your alarm invoice), use a dime to open the battery compartment. Call the service department between 9am-4pm on a weekday at (415) 388-5355 who will walk you through the process and help you test the button. Take care when handling the panic button. A panic signal will result in the police being sent.
If you haven’t replaced the battery in your portable panic button(s) within recent memory, it is time to replace and test your panic button. First, you will need one battery per panic button. Locate your portable panic button(s) and with your account number in hand (from your alarm invoice), use a dime to open the battery compartment. Call the service department between 9am-4pm on a weekday at (415) 388-5355 who will walk you through the process and help you test the button. Take care when handling the panic button. A panic signal will result in the police being sent.

